
FlipClock Editor is a desktop utility designed for configuring and updating compatible flip-clock displays. It allows users to customize clock presets, change display formats, synchronize time, and transfer display frames to the connected device.
Software Download:https://drive.google.com/file/d/1pdP6BsBlQ3Aooh32aSPKa5Ubk56Ebgfe/view?usp=sharing
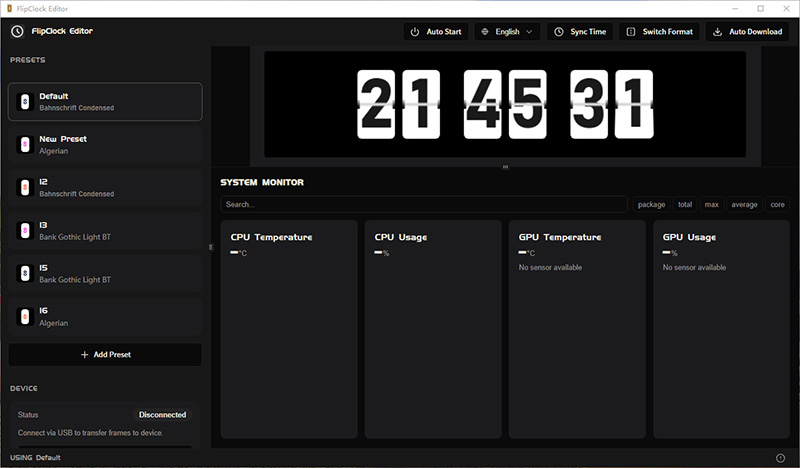
1. Connect the Device #
- Connect the flip-clock device to your computer using a USB Type-C cable.
- Open FlipClock Editor.
- Check the DEVICE section on the left side of the software.
- When the device is detected, the status will change from Disconnected to a connected status.
Note: If the device is not detected, make sure the USB cable supports data transfer and is securely connected.
2. Presets #
The PRESETS section allows you to select and manage different clock display styles.
Each preset can contain a different font or display style. The software may include several default presets, such as:
- Default
- Neu Preset
- I2
- I3
- I5
- I6
Select a preset to preview its clock display style.
Add a New Preset #
Click + Add Preset to create a new display preset.
You can use different fonts and display styles for your custom clock design.
3. Language #
Click Inglés in the top toolbar to select the software interface language.
4. Sync Time #
Click Sync Time to synchronize the clock’s time with your computer.
This is useful when the device time needs to be corrected or updated.
5. Switch Format #
Click Switch Format to change the clock display format.
Depending on the connected device and supported settings, this can be used to switch between different time display formats.
6. Auto Start #
The Auto Start function allows the software or related device function to start automatically according to the configured setting.
7. Auto Download #
Click Auto Download to automatically transfer the selected display content or frames to the connected device.
Make sure the device is connected before starting the transfer.
8. System Monitor #
The software interface includes a SYSTEM MONITOR section that can display system information such as:
- CPU Temperature
- CPU Usage
- GPU Temperature
- GPU Usage
- Package
- Total
- Max
- Average
- Core
Some hardware monitoring information may not be available depending on your computer hardware.
9. Device Status #
The DEVICE panel shows the current connection status of the flip-clock device.
If the status shows Disconnected, check:
- USB Type-C connection
- USB cable data-transfer capability
- Device power
- USB port
- Software connection status
Reconnect the device and restart the software if necessary.
Quick Start #
1. Connect
Connect the device to your computer via USB Type-C.
2. Open
Launch FlipClock Editor.
3. Select a Preset
Choose your preferred clock style from the PRESETS panel.
4. Sync Time
Click Sync Time to synchronize the device time.
5. Select Format
Click Switch Format to choose the desired display format.
6. Transfer
Use Auto Download to transfer the selected display content to the device.
7. Finish
Disconnect the USB cable after the transfer is complete.


